Ajouter et configurer un rapport BIRT personnalisé / Add and Configure a Custom BIRT Report
Cet article décrit comment configurer et ajouter un rapport Birt personnalisé dans JMap. Un rapport personnalisé est un rapport créé entièrement avec le créateur de rapport Birt. Un tel rapport est normalement configuré pour accepter des paramètres et valeurs passées par l'URL et interroger une base de données pour aller puiser l'information. Il existe différentes façons de configurer un rapport Birt pour accepter les paramètres de JMap. Cet article démontrera comment utiliser les filtres.
Création et configuration du rapport Birt dans JMap Admin
Lors de l'ajout d'un rapport personnalisé dans JMap, il existe deux façons de configurer les rapports. Chacune de ces options utilise la nomenclature de l'infobulle, donc référez-vous à cette section du Manuel de l'administrateur de JMap pour plus de détails (http://doc.k2geospatial.com/jmap/doc/7/admin/fr)
La première option permet de passer au rapport une série de valeurs en répétant son identifiant :
%param[Attribute, Parameter]
Ex: http://jmap.com/reports/myreport?%param[%0,'id']
http://jmap.com/reports/myreport?id=3&id=4&id=5
La seconde permet aussi de passer plusieurs valeurs mais cette fois les valeurs sont séparées à l'aide d'un séparateur et l'identifiant n'apparaît qu'une seule fois :
%param[Attribute, Parameter, Separator]
Ex: http://%h:%o/reports/myreport?%param[%0,'id',',']&session=%s
http://jmap.com:8080/reports/myreport?id=3,4,5&session=111
Pour plus de détails sur cette configuration, référez-vous à la section création de rapports d'information du Manuel d'administrateur de JMap.
Pour qu'un rapport soit exécuté par BIRT l'URL doit respecter la nomenclature du module d'affichage BIRT. Référez-vous à la documentation BIRT à cet effet (http://eclipse.org/birt/documentation/integrating/viewer-usage.php). Pour JMap, l'engin de rapport est disponible par défaut dans /reports. Donc si par exemple un rapport 'report1.rptdesign' est copié dans le répertoire jmap\reports\test, l'URL pour afficher le rapport en format pdf peut être :
http://jmap.com:8080/reports/run?__report=test\report1.rptdesign&__format=pdf&%param[%0,'id']
Sécurité
Si vous déployez des rapports en utilisant l'instance d'Apache Tomcat de JMap, à noter que par défaut, les fichiers déployés sous jmap/reports peuvent être téléchargés en accédant directement à l'URL du fichier. Pour contourner cette faille potentielle de sécurité, vous pouvez déployer les rapports dans par exemple jmap\reports\WEB-INF\reports. Puisque ce répertoire n'est pas désservi par Tomcat, le fichier du rapport ne pourra pas être téléchargé, mais sera accessible par Birt pour génération du rapport. Le répertoire WEB-INF\reports serait par la suite ajouté au nom du rapport dans l'URL:
Configuration du rapport Birt
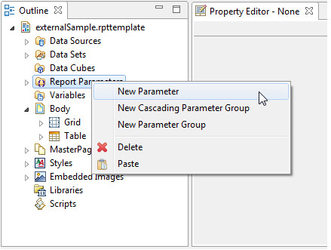
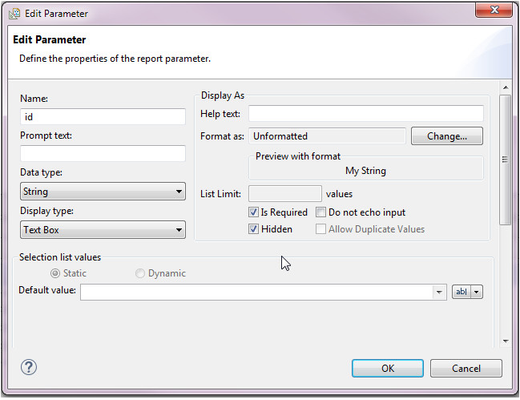
- Créez un nouveau paramètre de rapport avec les valeurs suivantes. Notez que le nom du paramètre doit concorder avec l'identifiant de l'URL, par exemple, pour %param[%0,'id'], le nom du paramètre est 'id'.
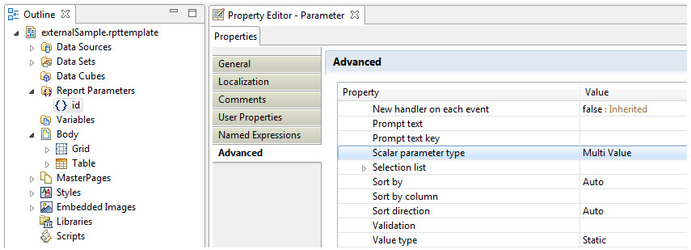
- Assurez-vous que le 'Scalar parameter type' de ses propriétés avancées est à 'Multi Value' :
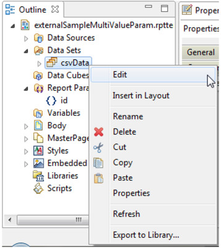
- Éditez votre jeu de données :
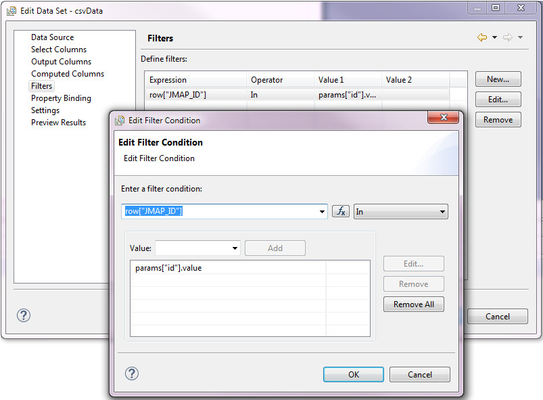
- Ajoutez un nouveau filtre. Dans ce cas, le paramètre 'id' configuré dans l'URL du rapport correspond à la colonne 'JMAP_ID' et la fonction 'in' indique que seuls les résultats correspondant aux valeurs du paramètre seront affichés :
Le rapport est prêt à accepter et filtrer les résultats selon la sélection de l'application JMap.
Lorsque la configuration d'un rapport d'information dans JMap Admin est modifiée, il est nécessaire de redémarrer les applications JMap qui utilisent ce rapport pour que les modifications soient effectives. Pour les modifications apportées directement à un rapport BIRT, il n'est pas nécessaire de relancer l'application ni même de relancer un rapport d'information à partir de l'application. Par exemple, si un rapport d'information est lancé affichant les valeurs de 5 éléments, un simple rafraîchissement de la page du navigateur web après une modification du rapport suffit pour voir le rapport à jour.
English version
This article describes how to configure and add a customized BIRT report in JMap. A custom report is a report created entirely with the report creator BIRT. Such a report is normally configured to accept parameters and values passed by the URL and query a database to fetch information. There are different ways to set up a BIRT report to accept JMap settings. This article will demonstrate how to use filters.
Creating and configuring the BIRT report in JMap Admin
When adding a customized report in JMap, there are two ways to configure the reports. Each of these options uses the mouseover nomenclature, so refer to this section of the manual for more details (http://doc.k2geospatial.com/jmap/doc/7/admin/en).
The first option allows to pass to the report a series of value by repeating its identifier:
%param[Attribute, Parameter]
Ex: http://jmap.com/reports/myreport?%param[%0,'id']
http://jmap.com/reports/myreport?id=3&id=4&id=5
The second also allows to pass several values but this time the values are separated using a separator and the identifier appears only once:
%param[Attribute, Parameter, Separator]
Ex: http://%h:%o/reports/myreport?%param[%0,'id',',']&session=%s
http://jmap.com:8080/reports/myreport?id=3,4,5&session=111
For more details on this configuration, refer to the Information Reports section of the JMap Administrator's Manual.
For a report to be executed by BIRT the URL must respect the nomenclature of the BIRT display module. Refer to the BIRT documentation for this purpose (http://eclipse.org/birt/documentation/integrating/viewer-usage.php). For JMap, the gear is available by default in /reports. So if for example a 'report1.rptdesign' report had been copied to the jmap\reports\test directory, the URL to display a report in pdf format could be:
http://jmap.com:8080/reports/run?__report=test\report1.rptdesign&__format=pdf&%param[%0,'id']
Security
If you deploy reports using JMap's Apache Tomcat server, please note that the report files under the directory jmap/reports will be accessible from the URL of the report, which could be a potential security risk. As a workaround, you can deploy the reports under jmap\reports\WEB-INF\reports. As the files under WEB-INF are not served by Tomcat, they will not be accessible from the web server, but the files will be accessible for Birt to generate the reports. The URL of the report would then have to contain the WEB-INF\reports folder:
Configuring the BIRT report
- Create a new report parameter with the following values. Note, the name of the parameter must match the identifier of the URL, for example, for % param[%0,'id'], the name of the parameter is 'id'.
- Make sure that the 'Scalar parameter type' of its advanced properties is 'Multi Value':
- Edit your dataset:
- Add a new filter. In this case, the parameter 'id' configured in the URL of the report corresponds to the column 'JMAP_ID' and the function 'in' indicates that only the results corresponding to the values of the parameter will be displayed:
The report is then ready to accept and filter the results according to the JMap application selection.
When the configuration of a report in JMap Admin is changed, it is necessary to restart the JMap applications that can use this report for the changes to take effect. For changes made directly to a BIRT report, you do not need to restart the application or even restart an information report from the application. For example, if an information report is launched displaying the values of 5 elements, a simple refresh of the web browser page after a modification of the report is sufficient to see the changes that have been made.